

Smarter Upload Controls in Salesforce


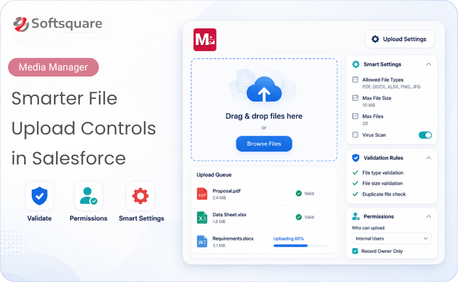
Table of Contents


Uploading files in Salesforce is part of everyday work for sales, service, field, and operations teams. But without the right controls, Salesforce records can quickly collect large files, unsupported formats, duplicates, and documents that do not fit the record’s purpose.
These are common Salesforce file upload limitations teams face when file handling is not guided by process-specific rules. Over time, files become harder to manage, search, preview, and maintain.
Media Manager helps Salesforce admins create a more controlled upload experience by defining what users can upload, how files are uploaded, and how image quality should be handled before files are saved in Salesforce.
Common Salesforce File Upload Challenges
Standard file uploads may work for basic needs, but admins often need more control when files are part of a daily business process. Common file upload Salesforce challenges include:
- Users uploading file types that are not needed for the record
- Large image files increasing storage usage
- Duplicate or outdated files make it harder to identify the latest version
- Admins need different upload behavior for different teams, objects, and devices
For example, a Case record may only need customer screenshots, PDFs, and short videos. A field visit may need mobile images with location details. A sales record may need proposals, spreadsheets, and signed documents. One generic upload experience does not always fit every Salesforce workflow.
How Media Manager Improves the End-User Upload Experience
Media Manager helps admins define file upload controls in Salesforce for each workflow while keeping the upload experience simple for end users.
With Media Manager, teams can:
- Control accepted file types so users can upload files to Salesforce only in relevant formats such as PDFs, images, videos, Word, Excel, HEIC, or other approved file types.
- Reduce unnecessary file clutter by blocking unsupported uploads before they are added to Salesforce records.
- Improve storage handling with image compression options like Original Size, Best Quality, Space Saver, and Custom Quality.
- Support version-based updates by allowing users to upload a new version of an existing file instead of creating duplicate copies.
- Help field and mobile users work with mobile-captured files, including HEIC images and location-related file information where configured.
- Keep file work in one place with upload, preview, update, download, and file management actions enabled by the admin.

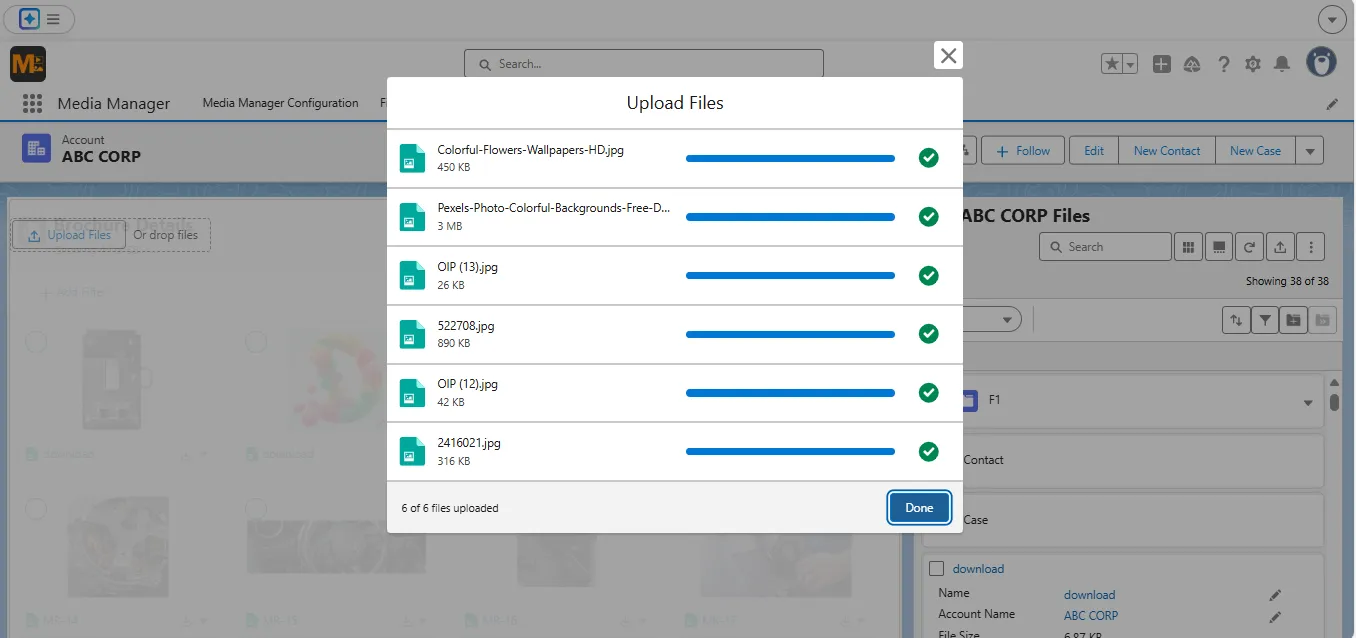
This makes Media Manager for Salesforce file uploads useful for teams that need admin-level governance without making file upload tasks harder for end users.
Upload Controls Admins Can Configure
Media Manager gives Salesforce admins configuration-level control over how uploads should behave.
Allow Specific File Types
Admins can define which file types users are allowed to upload. The manual mentions examples such as MOV, HEIC, Word, and Excel files.
This helps admins keep uploads relevant to the business process.
For example, admins can allow PDFs and screenshots for Cases, HEIC or image files for field visits, document formats for sales records, or PDFs only for compliance records.
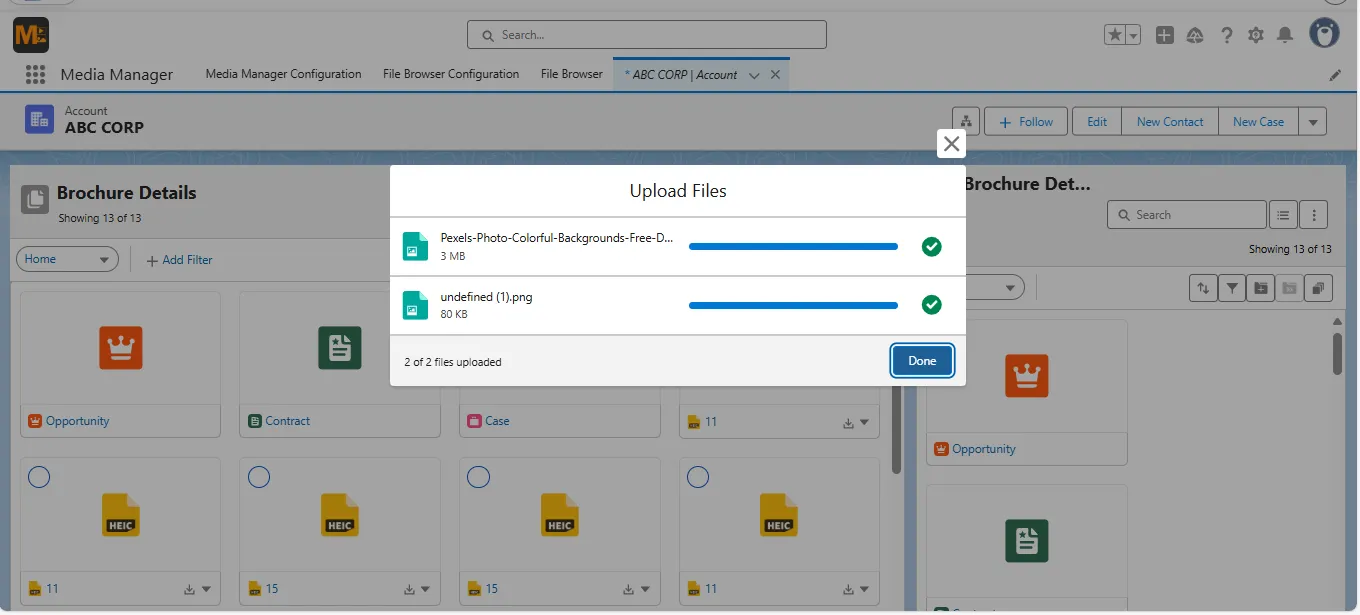
Default file types can also be restricted by unchecking the pre-selected options.
Add Additional File Types
If the required file type is not part of the predefined list, admins can add additional file types using the text box provided in File Upload Settings.
The manual specifies that custom file types can be added using semicolon-separated values. This gives teams flexibility when their business process requires specific file formats.
Block Unsupported Uploads
When users try to upload file types that are not allowed, Media Manager displays an error message.
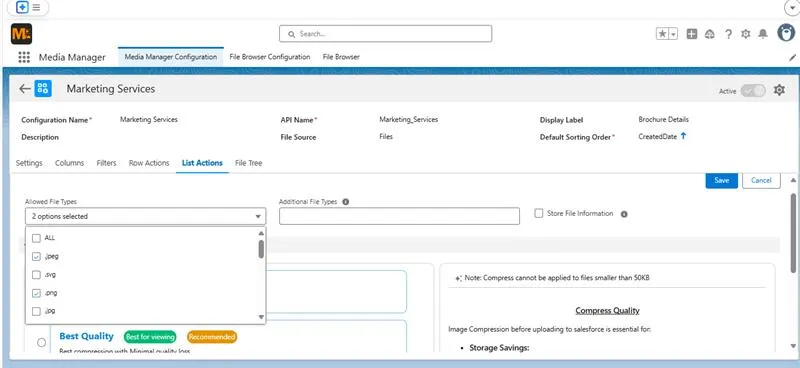
This is important because the control is applied at the point of upload. Users do not have to upload the file first and wait for an admin to clean it up later.
Store File Information
Admins can enable Store File Information to capture details such as location and creation date during image uploads.
This is useful for field inspection photos, site visit evidence, customer issue screenshots, asset condition images, and other location-based documentation.
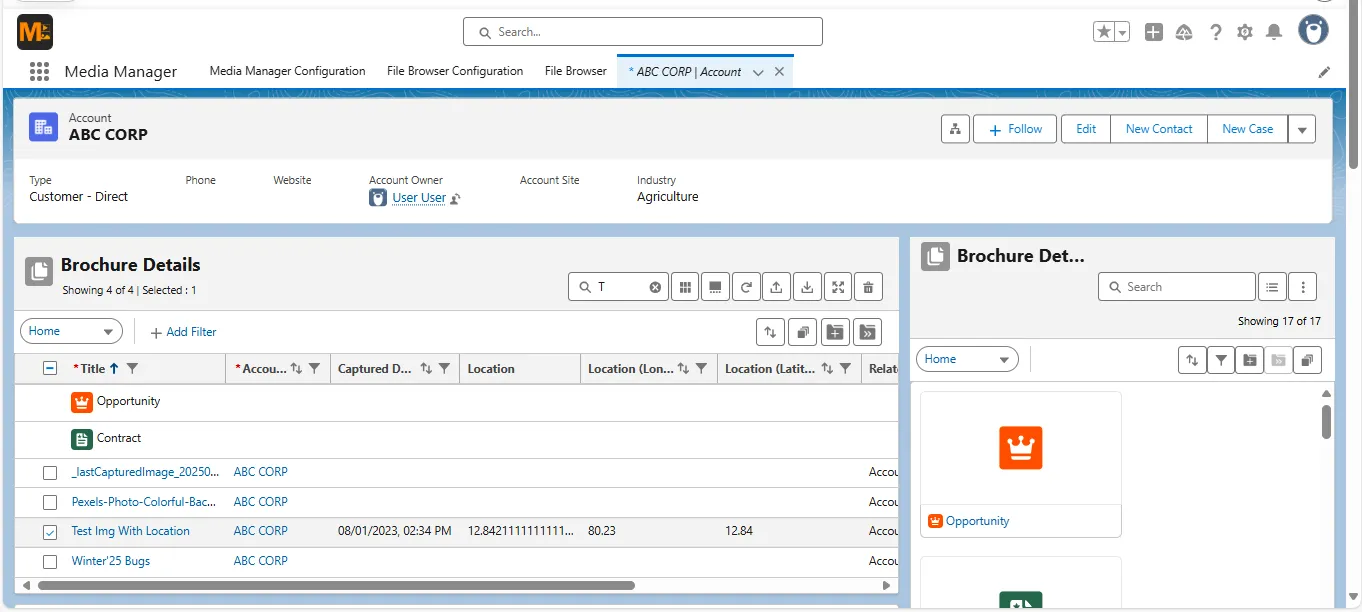
The manual notes that location and creation date details can be stored in the Content Version record during image uploads when this setting is enabled.
Image Compression Quality
Media Manager allows users to compress images before uploading them through List View.
Admins can choose from the available compression options:
- Original Size: Keeps the image unchanged
- Best Quality: Applies compression with minimal quality loss
- Space Saver: Reduces file size with higher compression
- Custom Quality: Allows a compression quality value from 10 to 80
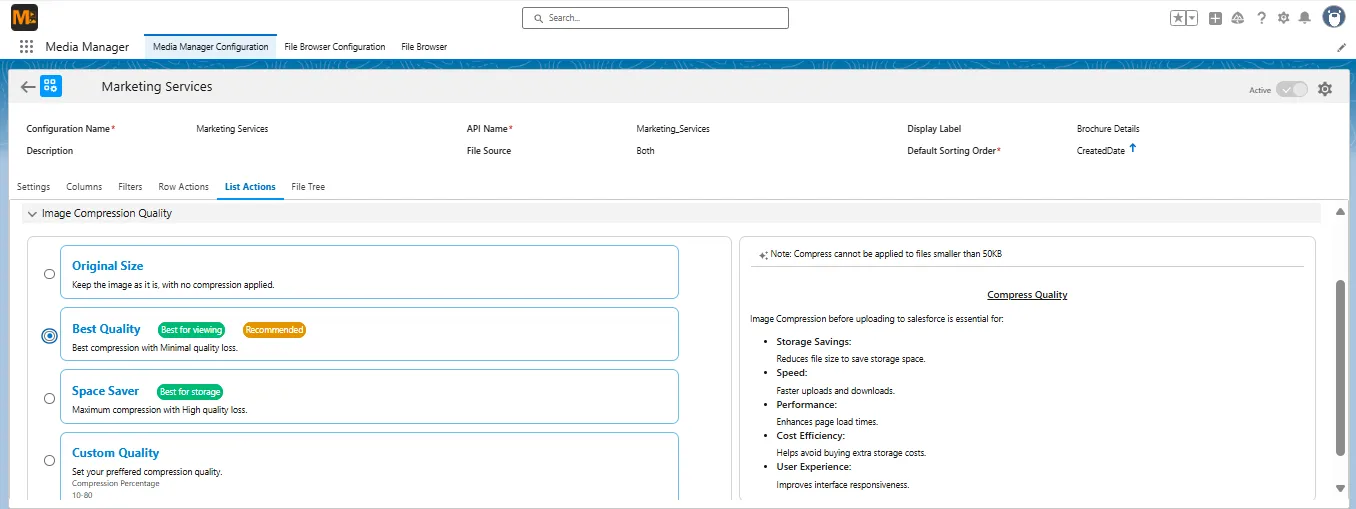
For example, a field service team may upload multiple site photos after every customer visit. Instead of storing every image in its original size, admins can set a preferred compression option to reduce file size while keeping the image clear enough for review. This helps teams manage Salesforce storage better without asking users to compress files outside Salesforce.
Upload New Version
Not every file update should create a new file.
If users upload a revised proposal, updated invoice, corrected image, or new compliance document as a separate file every time, records can quickly become cluttered with duplicates.
Media Manager supports Upload New Version as a Row Action. This lets users replace an existing file with an updated version while preserving version history. The manual notes that Upload New Version keeps a single file reference, maintains version history, and is available across Slider, List, and Tile views.
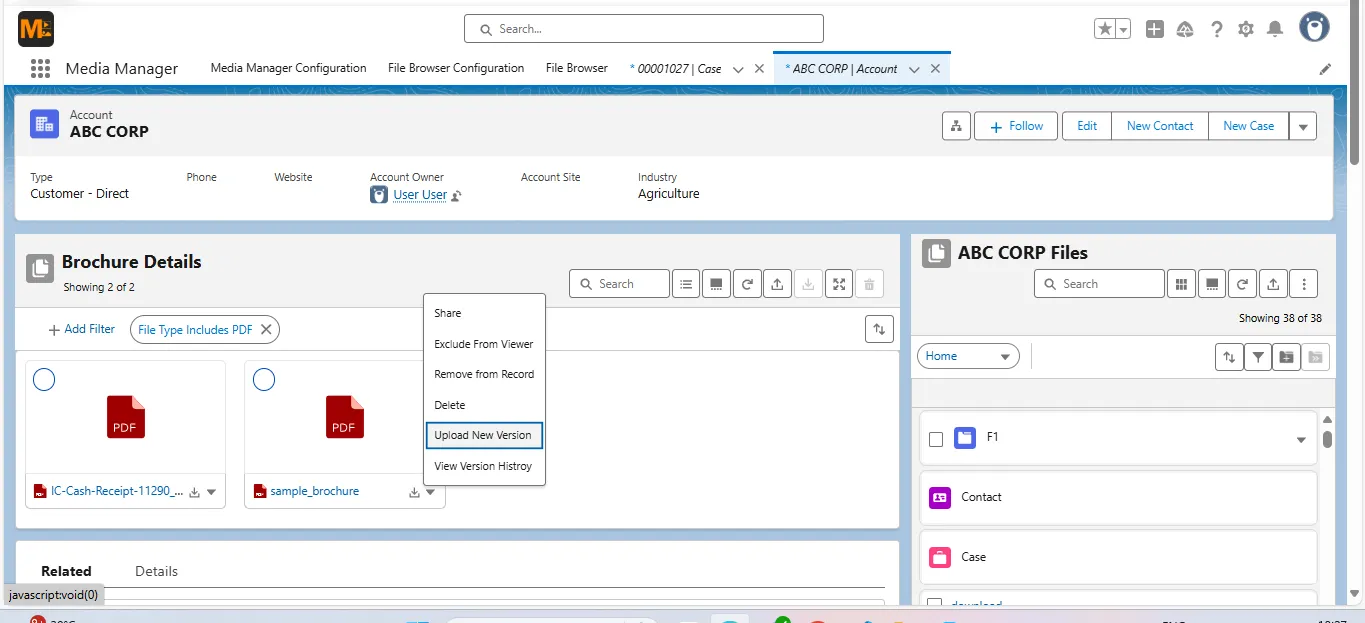

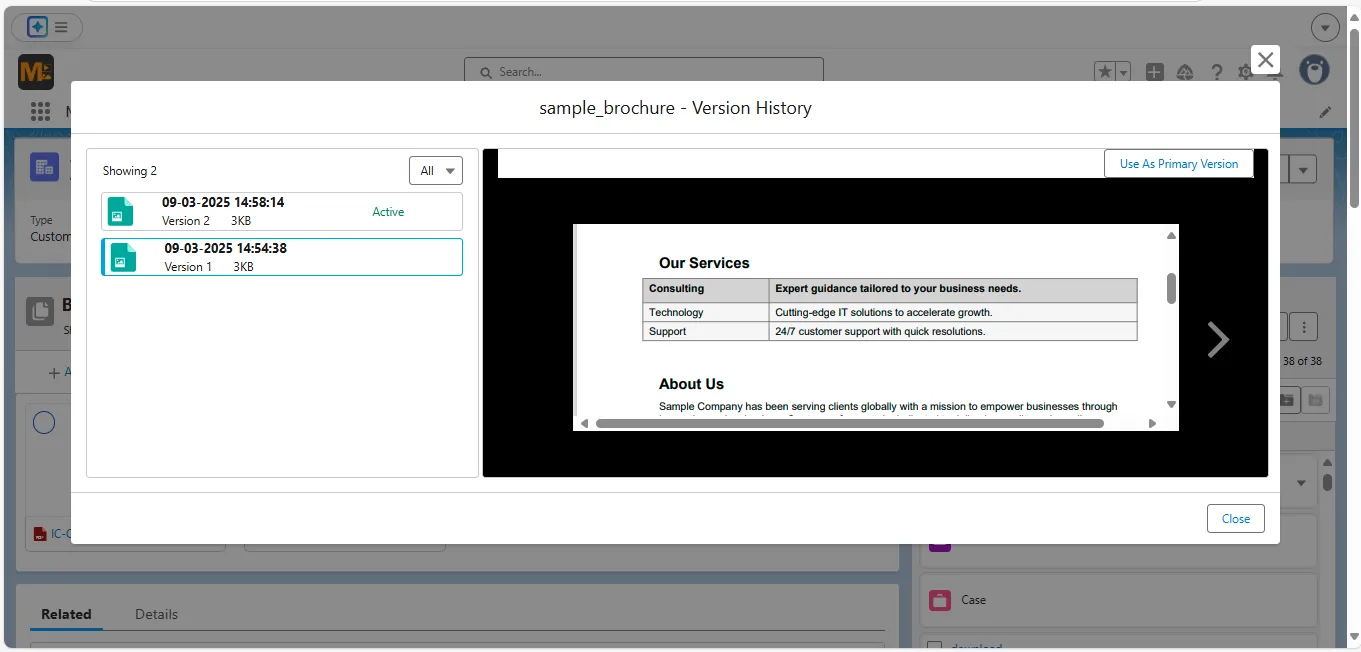
This is useful for revised proposals, corrected screenshots, updated invoices, compliance files, and field inspection photos.
Admins can enable Upload New Version from Row Actions. When users upload a new version, the file must match the allowed file types configured in upload settings.
Mobile Compatibility for Upload Workflows
Media Manager supports mobile file workflows for field users and service representatives. This is helpful when users capture or upload files directly from mobile devices, especially for inspection photos, customer issue images, or field documentation.
.webp)
For iPhone uploads where location details are needed, users should use the “Most Compatible” camera format, enable location services before taking the picture, and ensure Store File Information is enabled in the Media Manager configuration.
.webp)
HEIC files are also supported. Users can preview HEIC files in Slider View and convert them to JPG for better performance and consistent viewing when needed.
Configuration Setup for Admins
Step 1: Open the Media Manager Configuration
Open the configuration where upload controls need to be applied.
Step 2: Enable Upload as a List Action
Go to List Actions and enable Upload.
This makes the upload option available to users in the Media Manager component.
Step 3: Configure File Upload Settings
Define the upload behavior:
- Select allowed file types OR Remove file types that should not be accepted
- Add additional file types if required
- Enable Store File Information if location or creation details matter
- Choose the image compression quality
Step 4: Enable Upload New Version
Go to Row Actions and enable Upload New Version if users need to replace existing files instead of creating duplicates.
This keeps one file reference while maintaining version history.
Step 5: Place the Component
Add Media Manager V2 to the required Lightning page and select the appropriate configuration.
Admins can place it on record pages, app pages, home pages, and supported community pages. However, the manual notes that actions such as Upload, Share, Delete, Exclude from Viewer, and Remove from Record are not supported in communities.
Step 6: Test as an End User
Before rollout, test the full upload experience:
- Upload an allowed file type
- Try a blocked file type and check the error message
- Upload an image and verify compression behavior
- Upload a new version of an existing file
- Test mobile upload and stored file information if field users are involved
Practical Use Case: Controlled Case File Uploads
A support team handles product complaints through Salesforce Cases. Agents often receive screenshots, invoices, product photos, and short videos from customers.
Without upload controls, Case records can end up with:
- Oversized images
- Unsupported formats
- Multiple copies of the same document
- Files that are difficult to identify later
With Media Manager, the admin can configure a Case-specific upload experience:
- Enable Upload as a List Action so agents can add files directly from the Case file workspace.
- Allow only relevant file types such as PDF, PNG, JPG, JPEG, MP4, and MOV.
- Set image compression to Best Quality so screenshots remain clear but more optimized.
- Enable Upload New Version so revised invoices or corrected screenshots replace older versions without creating duplicates.
- Enable Store File Information if creation date or location details are useful for issue tracking.
- Place the Media Manager component on the Case Lightning Record Page.
For agents, the experience becomes simple: upload the right file, preview it immediately, replace it when needed, and continue working from the same Case page.
For admins, the record stays cleaner, easier to manage, and better aligned with the team’s file handling rules.
Conclusion
Salesforce file uploads should be simple for users and controlled enough for admins to keep records clean.
With allowed file types, drag-and-drop upload, image compression, Store File Information, Upload New Version, and mobile-compatible file handling, Media Manager helps teams manage Salesforce file upload processes in a more structured and practical way.
For teams looking to improve Salesforce file uploads using Media Manager, these upload controls help reduce clutter, support better file governance, and make everyday file handling easier inside Salesforce.
Ready to Transform with AI?
More Insights for you









Ready to Transform Your Business with Salesforce & AI?
