Optimize Salesforce User Onboarding with User 360
.svg)
Table of Contents
Managing users within Salesforce, especially when handling multiple roles, permissions, and profiles, can be a time-consuming task. Efficient user management enhances productivity, strengthens data security, and ensures seamless transitions. In this two-part blog series, we introduce User 360, a native Salesforce tool designed to automate and simplify user lifecycle management.
In this first part, we will focus on setting up configuration templates, which form the backbone of efficient user management. In the next part, we’ll explore how these templates can be leveraged in user requests for real-world applications.
Addressing Challenges in Salesforce User Management
Onboarding new users in Salesforce often involves several manual steps, each carrying the potential for errors or delays. Key challenges include:
- Multiple Steps: Setting up profiles, roles, and permissions manually for each user.
- Consistency: Ensuring all users are assigned the correct settings and permissions across different departments.
- Resource Intensive: The process can drain time and resources, especially for organizations with frequent new hires.
- Risk of Errors: Manual handling increases the chance of missing critical configurations or permissions.
- Scalability: For large teams or frequent hires, onboarding becomes increasingly difficult to manage manually.
How User 360 Solves Onboarding Challenges
User 360 offers a streamlined approach to user onboarding by automating key processes through configuration templates. In this first part of the series, we’ll guide you through setting up these templates to simplify onboarding. Key benefits include:
- Template-Driven Processes: Predefined templates for user creation, profile assignment, and permission setting.
- Automation: Automates repetitive tasks like assigning roles, permissions, and adding users to groups.
- Bulk Onboarding: Supports the onboarding of multiple users simultaneously without compromising accuracy.
- Customizable Settings: Allows administrators to tailor templates for specific departments or roles.
- Seamless User Experience: Reduces onboarding time and errors, providing a smoother experience for both admins and new users.
- Multi-Org Feature: Reduce manual steps across multiple-orgs, streamlining the process.
- Related Logs: Enable users to easily identify steps/actions failed.
Onboarding New Sales Manager
Scenario: You are onboarding a new user, Jordan Smith, into Salesforce. To streamline the process, you will create a process template to automate the steps involved in setting up a new user. This template will include creating the user, assigning permissions, adding the user to groups, and sending a notification email.
Objective: We’ve automated the onboarding process by crafting a pre-defined template. Employing this streamlined approach ensures a more efficient onboarding experience.
Step-by-Step Guide
1. Navigate to Configurations: Access the “Configurations” tab to manage user actions, your starting point for configuring templates.
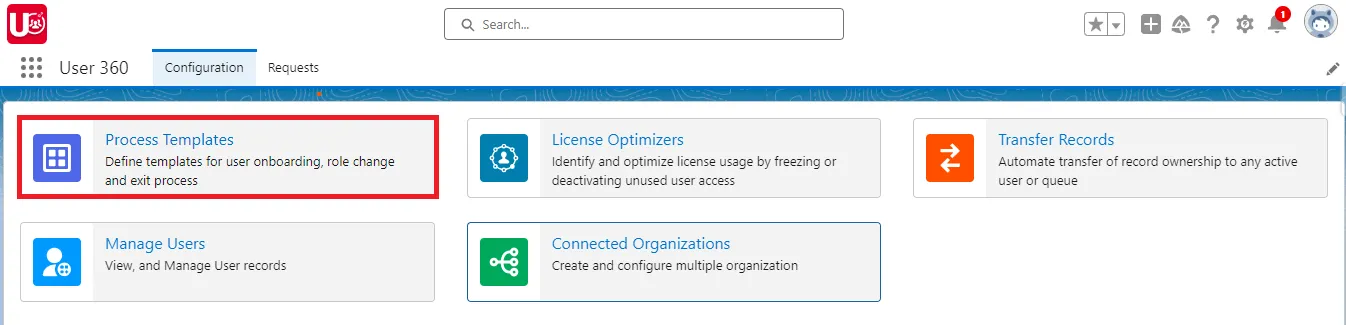
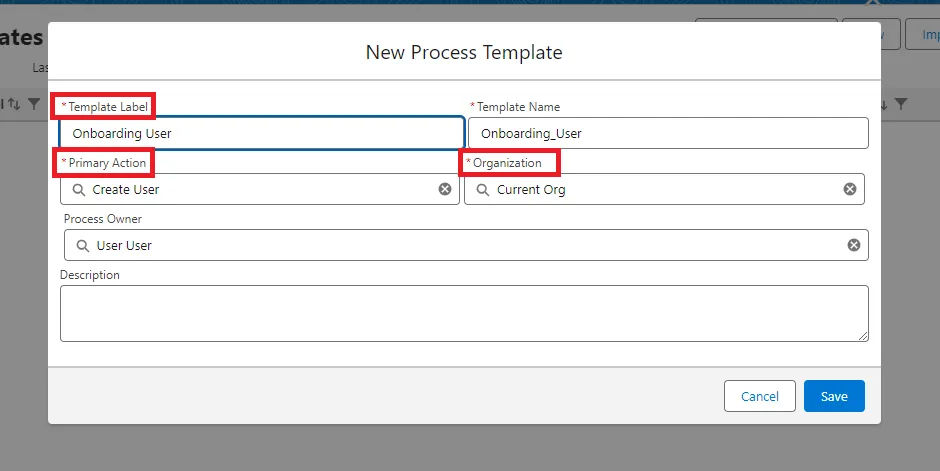
2. Create a Process Template: Within “Configurations,” select “Process Templates” and click “New” to initiate a template.
- Define the Primary Action: Set the primary action to “Create User” to specify the template’s function.
- Assign a Template Label: Enter “Onboarding User” as the template label. The template name will be auto populated.
- Select the Organization: Choose “Current Org.”
- Set the Process Owner: The process owner field is automatically populated with the login user’s name, but it can be edited if needed.
- Enter a Description: Provide a brief description of the template’s purpose to assist other administrators or users who may interact with it.
- Save the Template: Click “Save” to finalize the template creation.
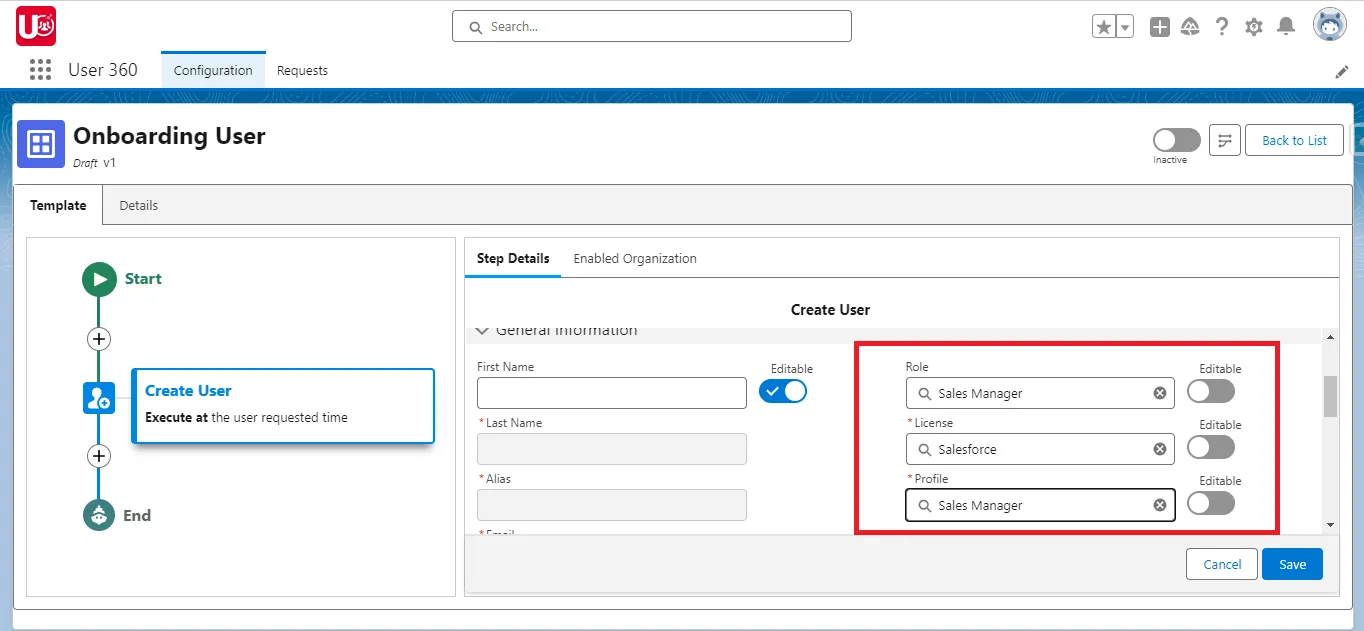
After Template Creation
3. Edit User Information:Update key user details such as Role and Profile, both set to “Sales Manager” and License set to “Salesforce”. Fields under ‘General Information’ will be pre-filled for convenience.
Note: Enhance customization by adding user fields from your Org and pre-saving values within the template.
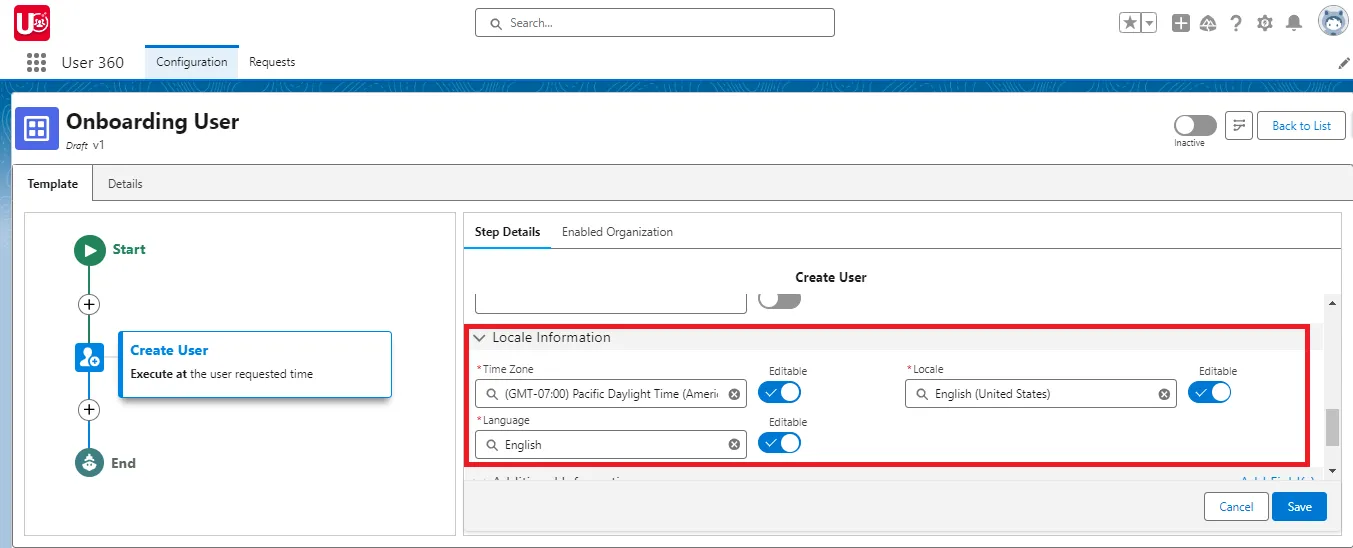
4. Set Locale Information: Predefined time zones, locales, and languages are available. If you need different settings, please adjust them according to your preferences. (Slide 2)
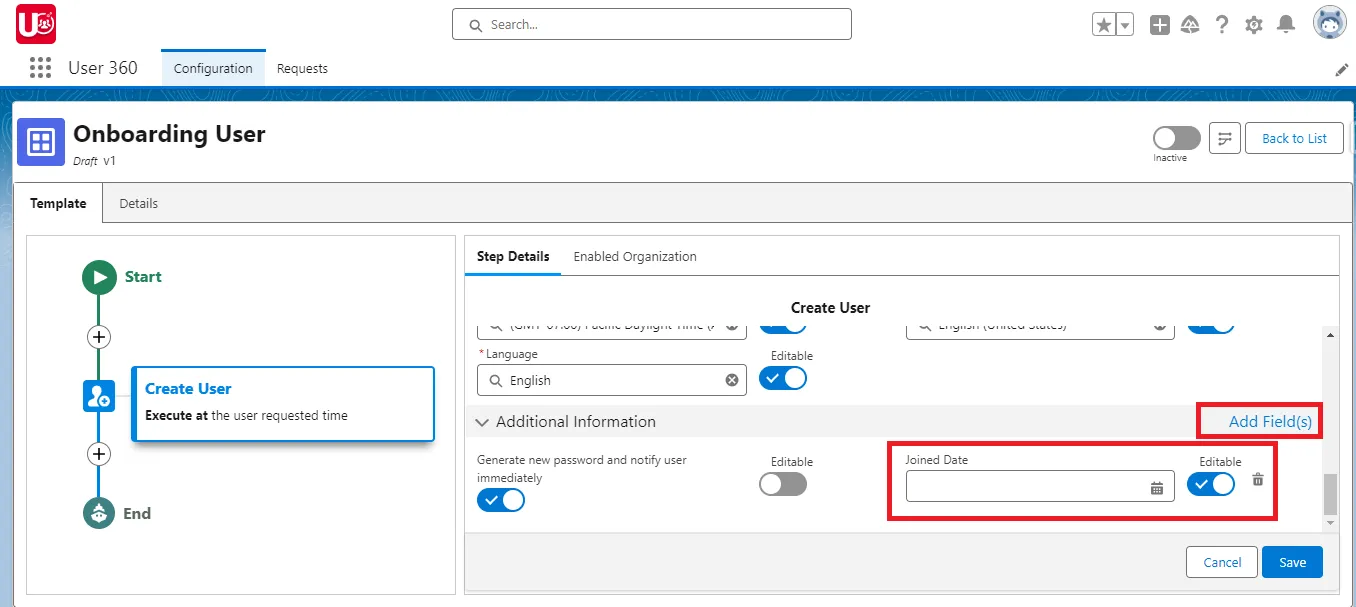
5. Configure Additional Information: Under “Additional Information,” click Add Fields, choose the “Joined Date” field, and make sure Editable is enabled for that field. (Slide 3)
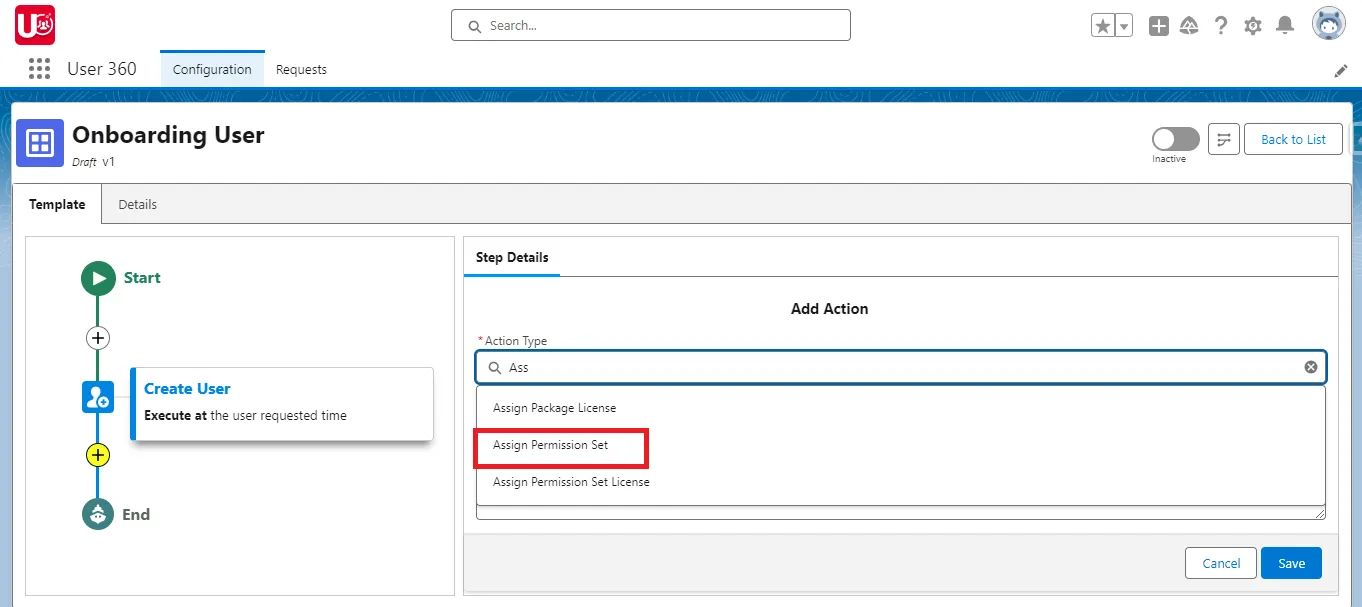
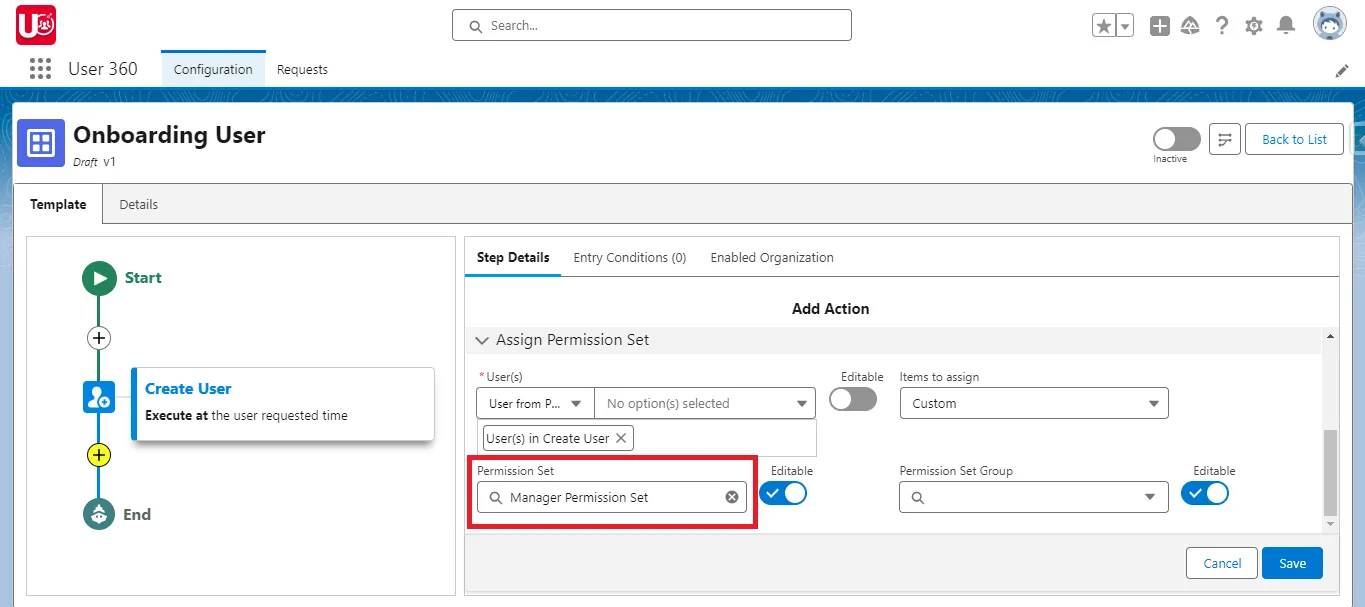
6. Assign Permissions: Select “Assign Permissions” as the next action. Specify execution time, users, and choose “Manager Permission” permission set
NOTE: Another way to assign permissions – you can also choose to also “Copy from” a User and decide which “Items to Copy”.
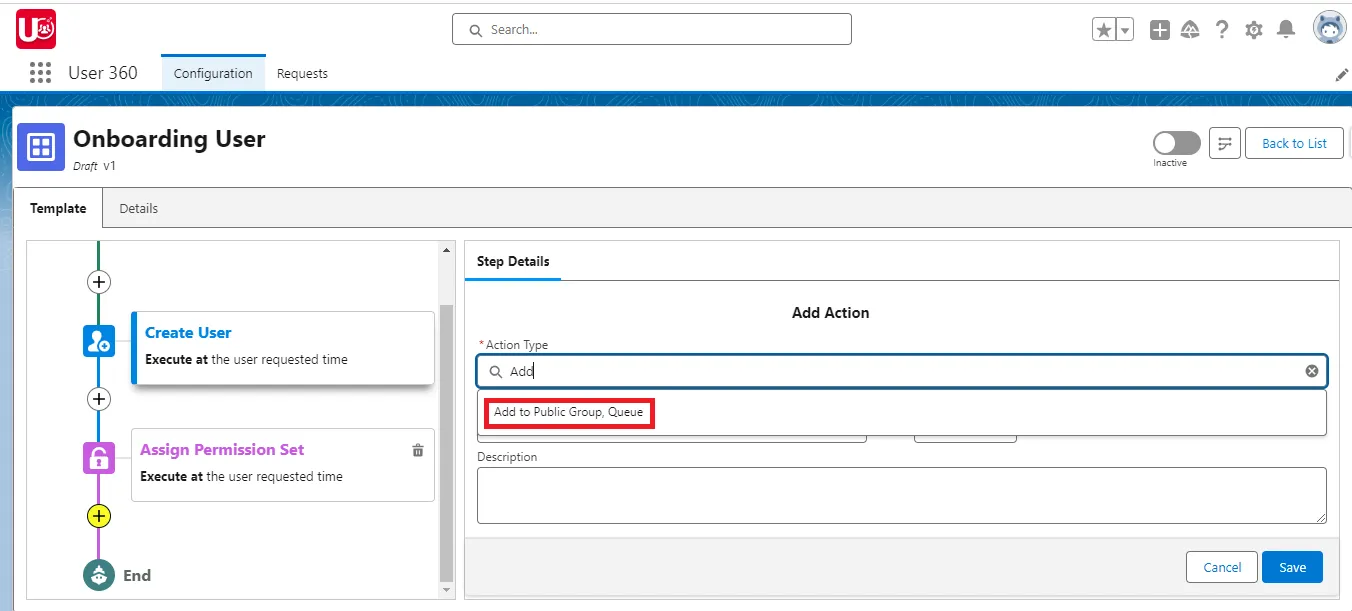
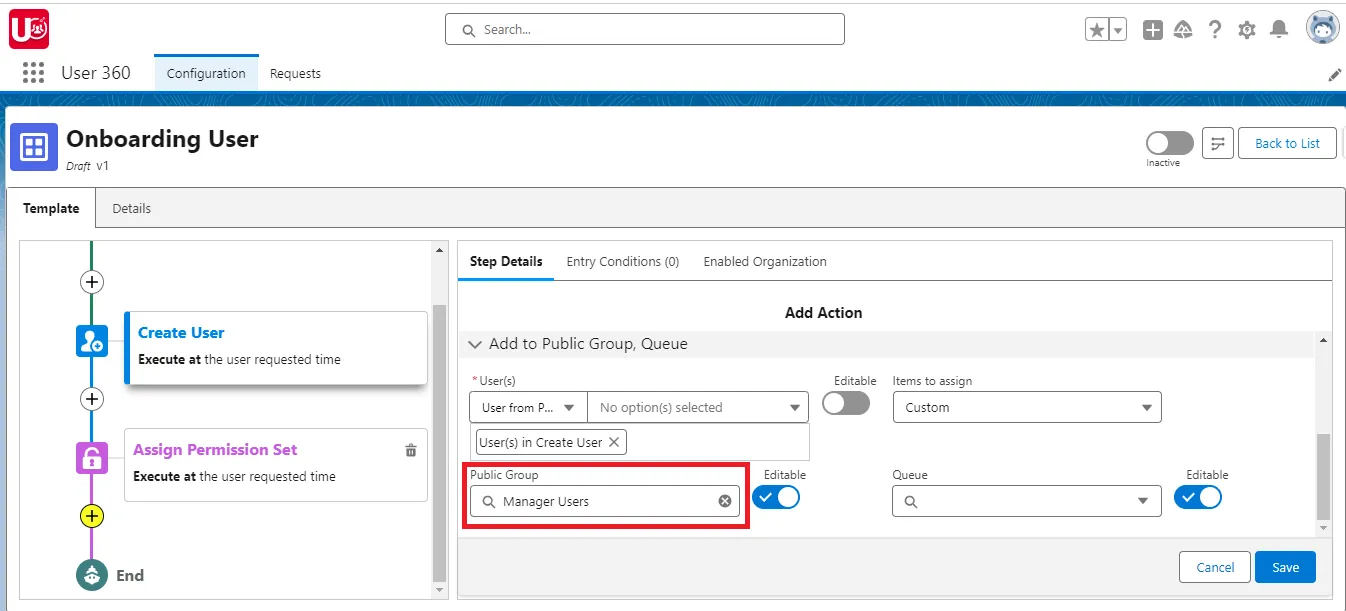
7. Add to Public Group/Queue: Select “Add to Public Group/Queue ” as the next action. Specify execution time, users, and choose “Manager Users” public group
NOTE: Another way to add them in groups or queues – you can also choose to also “Copy from” a User and decide which “Items to Copy”.
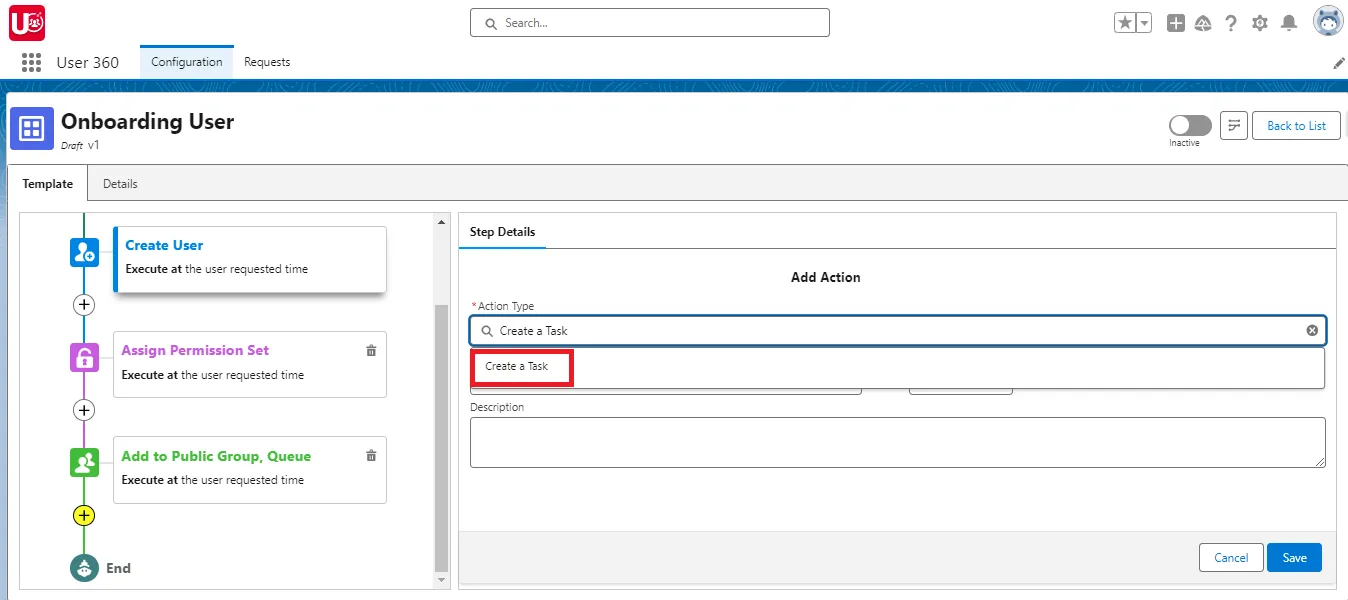
8. Create Task: To assign a task to the manager, select “Create Task” as the next action.
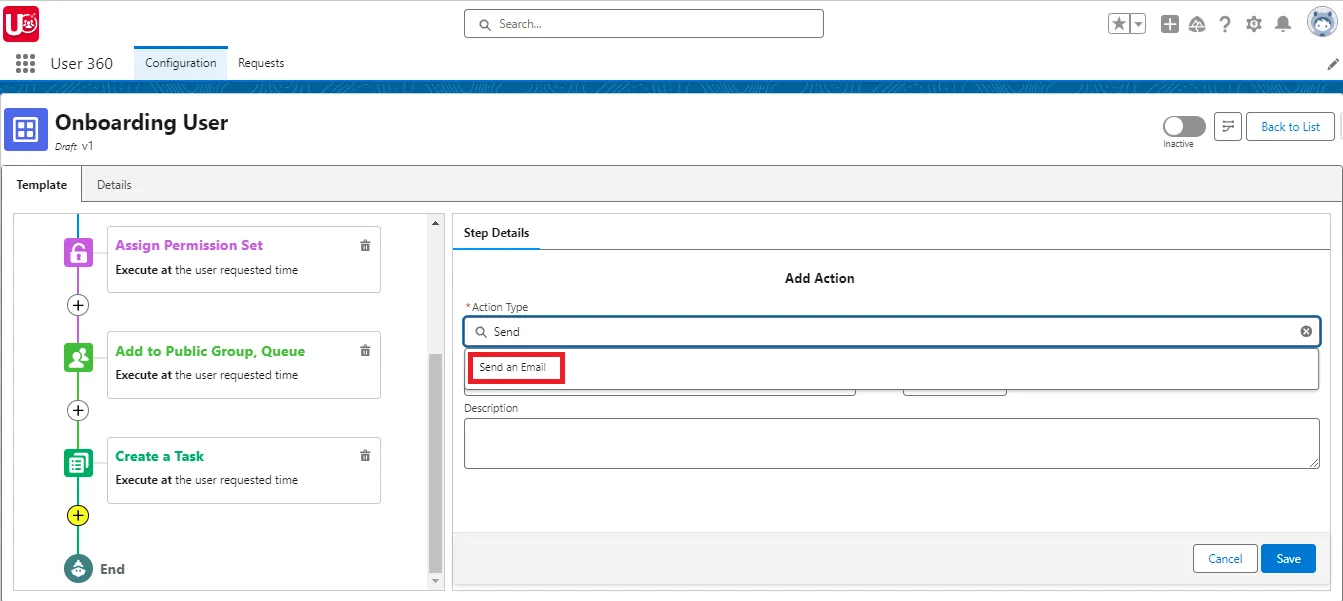
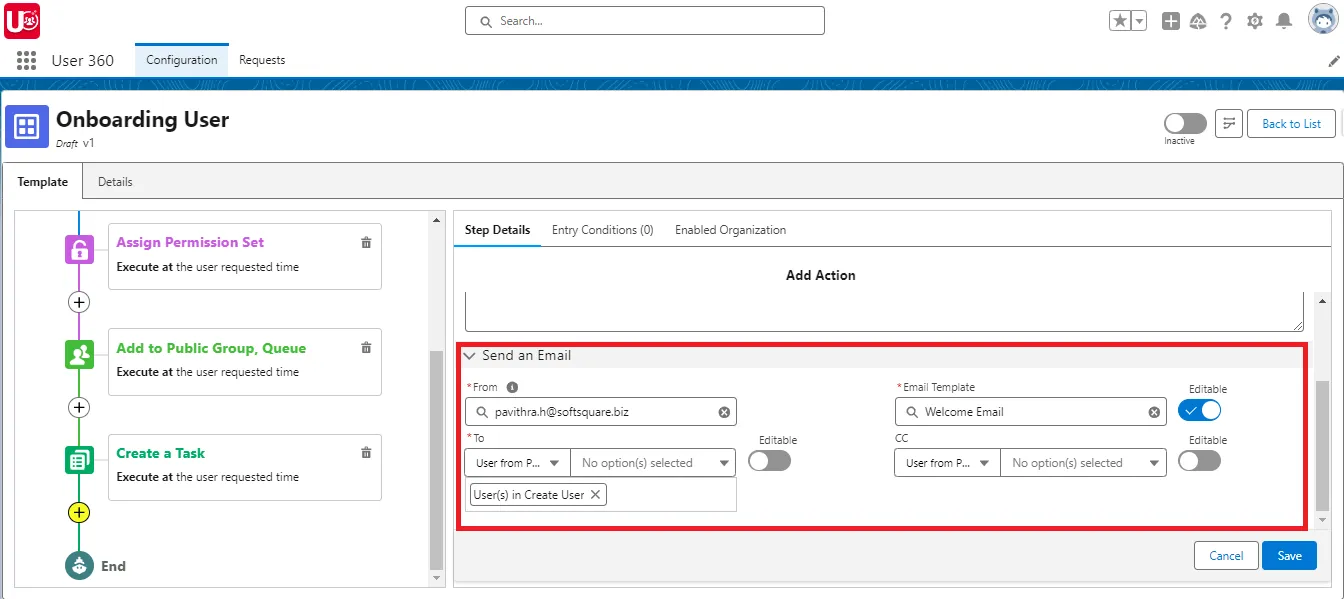
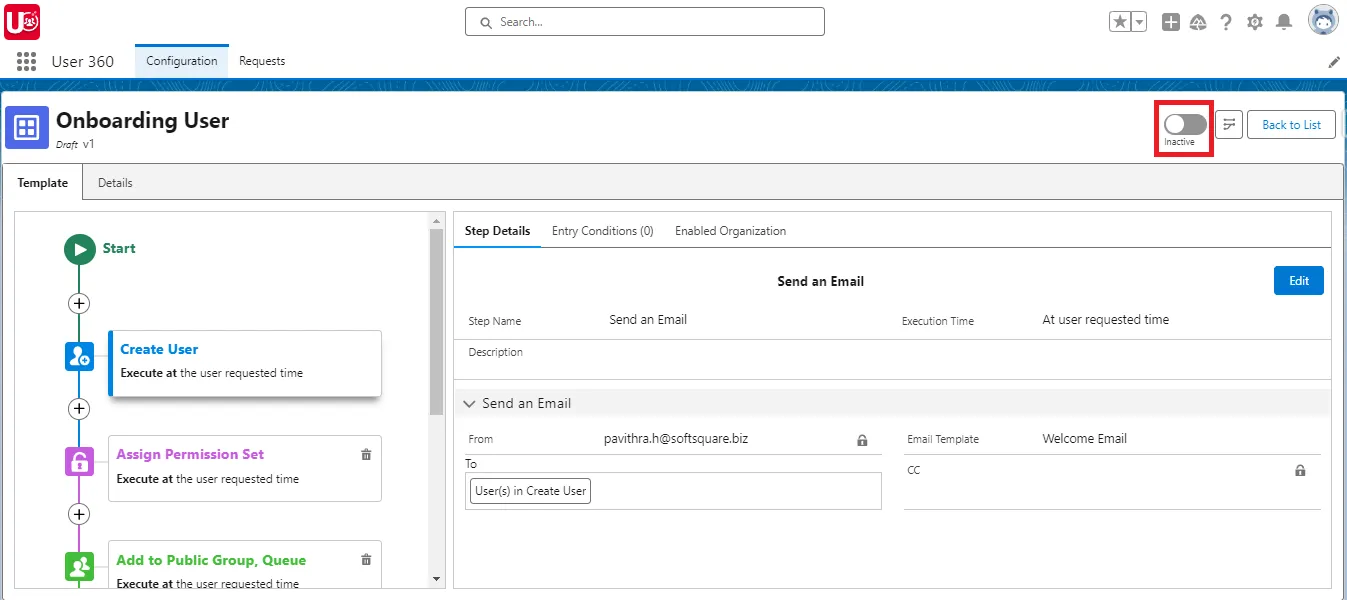
9. Send Notification Email: To welcome the newly created user, select “Send an Email” as the action. Then, complete the “To”, “From”, and “Template” fields to provide the user with their login details and any initial instructions or information.
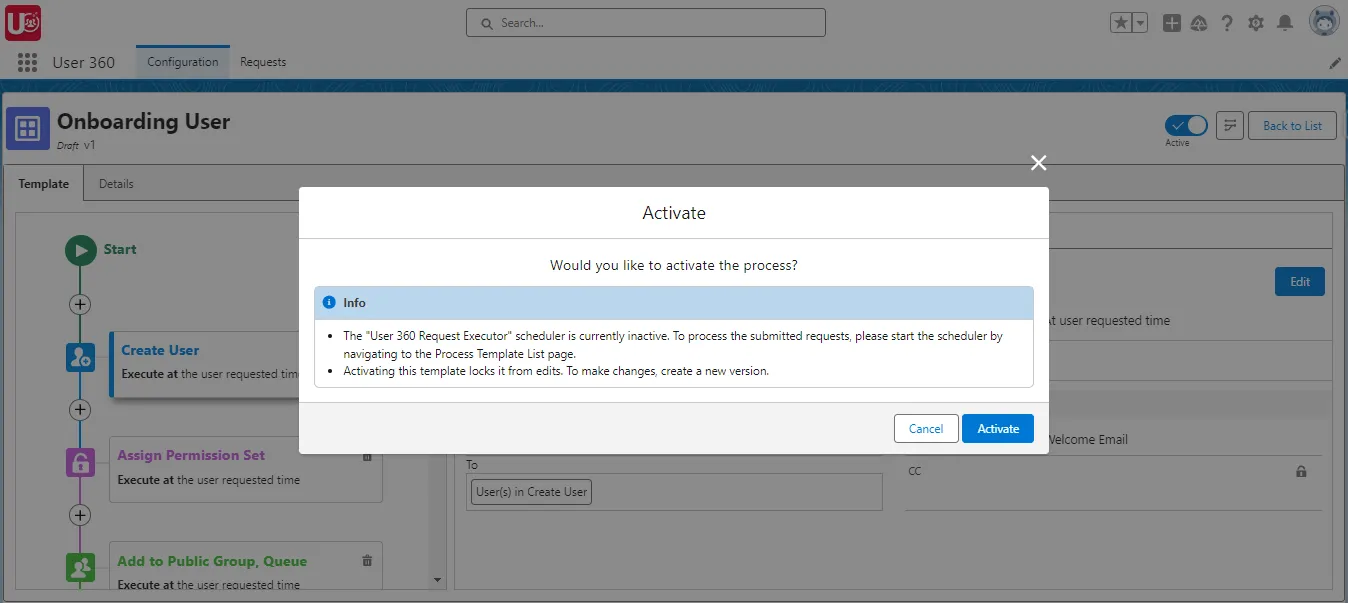
10. Activate Template: Save your steps and activate your template, making it ready for practical use in user management.
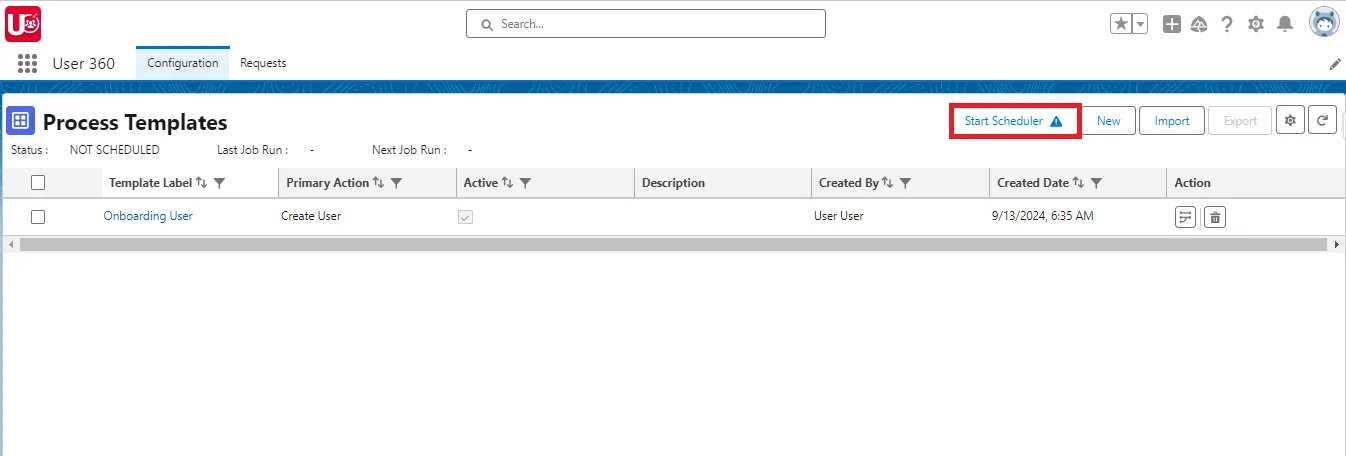
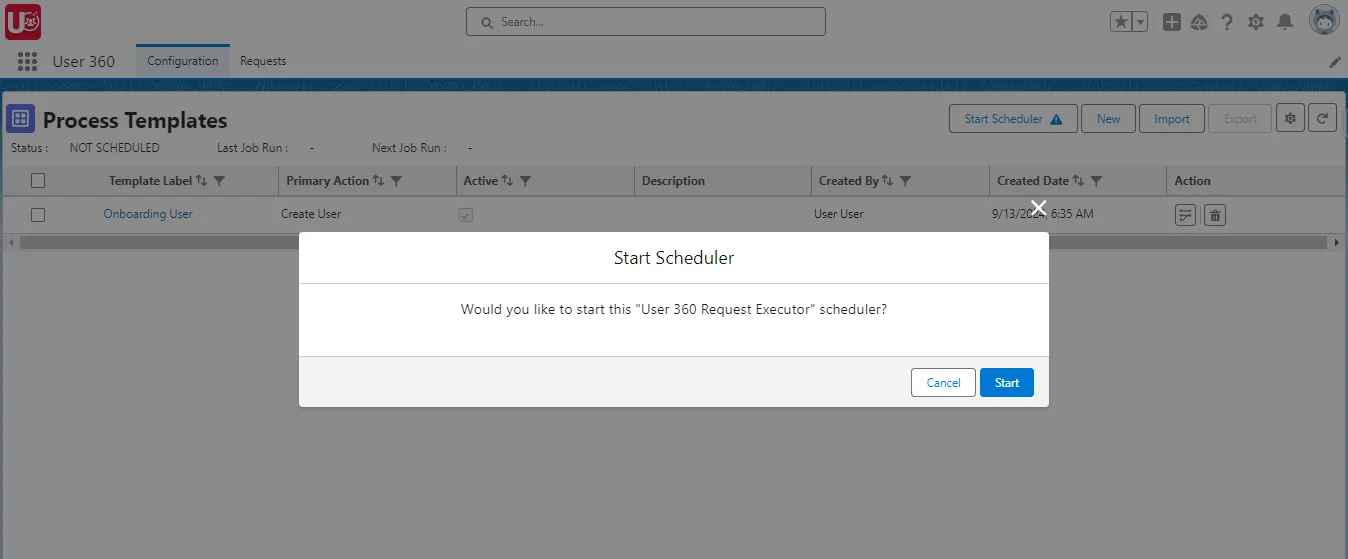
11. Start Scheduler: To execute the submitted request, we need to activate the scheduler.
NOTE: Once the template is activated, its fields cannot be edited. To make changes, you’ll need to create a new version of the template. For further details, please refer to the link.

Conclusion: Let’s Continue the Journey
By setting up configuration templates with User 360, you’ve taken the first step towards optimizing user management in Salesforce. These templates not only streamline onboarding but also reduce errors and save valuable time.
In the next blog, we’ll demonstrate how these templates can be applied to user requests, further enhancing your Salesforce user management processes. Stay tuned!
Next Blog: Leveraging User 360 templates for Salesforce User Requests (Continuation)
Ready to Transform with AI?
More Insights for you