Second-Generation Managed Packages
.svg)
Table of Contents
Say hello to the future of package development with Second-Generation Managed Packages”
If you’ve been using First-Generation Packaging (1GP) to develop packages on the Salesforce platform, it’s important to note that Second-Generation Packaging (2GP) is not just a simple upgrade to version 2.0 of 1GP. Instead, 2GP represents an entirely new and improved approach to package development, offering new ways to manage and develop apps and metadata.
2GP is the future of app development on the Salesforce platform, providing numerous benefits over its predecessor. Built on the Salesforce DX architecture, 2GP offers enhanced modularity, more precise control over dependencies, improved testing capabilities with their dependencies, and simpler packaging and distribution. It also provides more flexible and efficient workflows for development, making it easy to version, package, and deploy apps and metadata.
The Benefits of Second-Generation Managed Packages (2GP) in Salesforce Development
2GP is an automation-friendly approach to packaging, allowing developers to execute all packaging operations via Salesforce CLI or automation scripts. This streamlines the packaging process and makes it easier to manage packages at scale.
Second-Generation Managed Packages (2GP) offer many benefits for Salesforce developers. They integrate with source control systems, better utilize custom Apex code across packages, support parallel development by sub-teams, and are automation-friendly. By adopting 2GP, developers can improve the efficiency and effectiveness of their packaging process, and ultimately build better applications for their customers.
Namespace sharing
In 2GP it’s possible to assign the same namespace to multiple 2GPs. Sharing a namespace across packages lets you easily share code across packages in the same namespace.
Namespace sharing in 2GP is particularly useful for large projects where multiple packages are used to build a complex application. With namespace sharing, developers can easily share code between packages without worrying about conflicts or compatibility issues.
Another benefit of namespace sharing in 2GP is that it allows developers to better manage dependencies between packages. By using the same namespace across multiple packages, developers can explicitly declare dependencies and ensure that the correct versions are used.
In addition, namespace sharing can also make it easier to install and upgrade packages. When packages share the same namespace, they can be installed and upgraded together, ensuring that the application remains consistent and up-to-date with its dependencies.
Note: Although a single namespace can be used by many 2GPs, each 2GP package is associated with only one namespace.
Share Code Among Small Modular Packages
To make a class available to all packages in a namespace, you simply need to add the “@namespaceAccessible” annotation to the class definition. This tells Salesforce that the class is intended to be shared across packages in the same namespace. Once you’ve done this, the class can be accessed by other packages in the namespace, without the need for any special permissions.
It’s important to note that when sharing code between packages in this way, you should use public Apex classes and methods. This is because using global Apex can increase your global Apex footprint, which can impact the overall performance of your org.
With 2GP you can easily develop small interdependent packages and share logic between them. If you design your app to rely on small modular packages, package creation, and package installation is faster, and you’re less likely to hit limits.
This approach also supports reuse of code across applications. A package with common utility code can be used by two or more published packages. There’s no need to repeat the code for each app.
Note: When choosing a namespace for your software package, it’s important to keep in mind that the namespace cannot be changed later on. This is especially crucial if you plan to sell your package in the future, as the namespace must be unique. In such cases, it may not be appropriate to use a single namespace across all your packages, and you may need to come up with different namespaces for each package.
2GP Package Versioning Is Flexible
We talked about how 2GP is a source-driven development model, and how 2GP enables you to share Apex code across packages, but the power of flexible package versioning is where 2GP becomes really exciting.
Package ancestry is the term that describes the tree-like version structure used in 2GP. Package ancestry is one of the reasons 2GP versioning is flexible, because ancestry lets you abandon a package version you no longer want to build on.
Example of a Package Ancestry Tree
To demonstrate the benefits of ancestry in software development, we’ll be using an illustration that only shows the first two digits of a version number: the major and minor values. This approach simplifies the illustration while still highlighting the advantages of using ancestry to group related versions together.
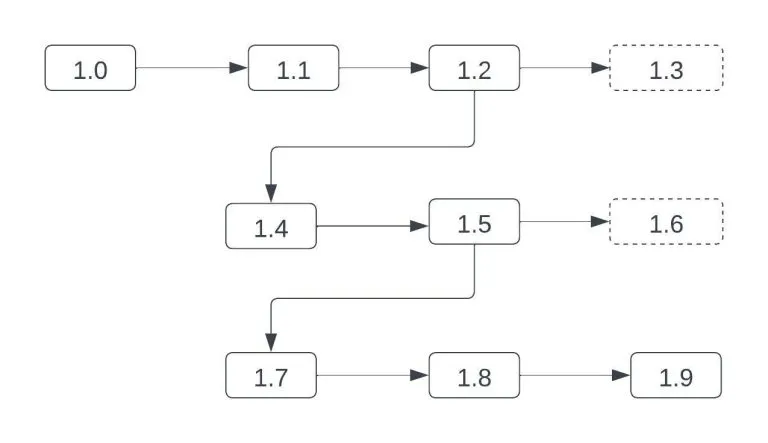
Say your team creates version 1.0, 1.1, then 1.2, then 1.3 and oops! 1.3 made a mess of 1.2. Not a problem. When you create a new package version, you specify which package version is the ancestor. So you abandon 1.3, and make 1.2 the parent of 1.4. And this process can be repeated. For example, the illustration shows how to abandon 1.6, and build 1.7 off of 1.5.
Key Aspects in 2GP Package Development
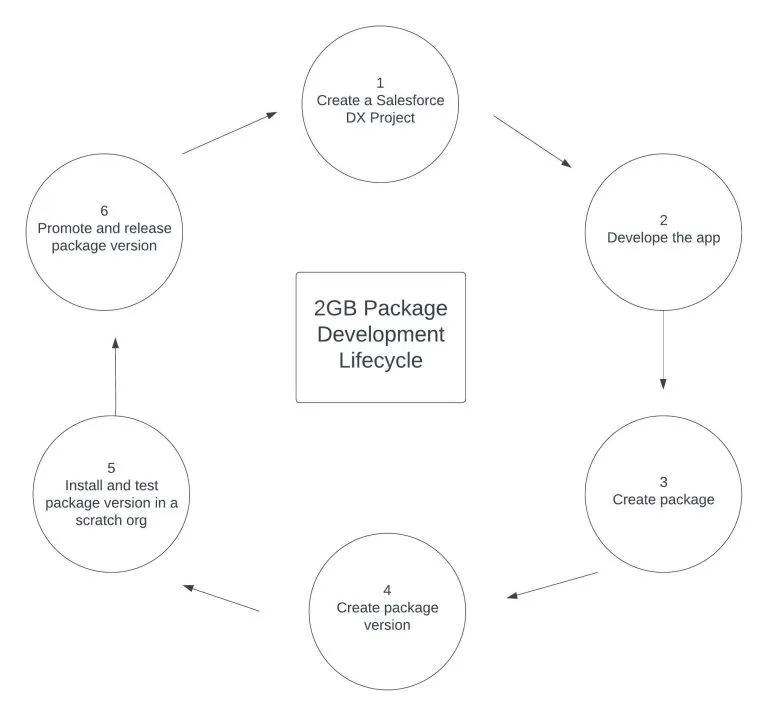
Step 1: Create a Salesforce DX Project
To begin developing a Salesforce app with the second-generation packaging (2GP) model, the first step is to create a Salesforce DX project using the Salesforce CLI. This involves setting up a repository in your source control system to manage the metadata for your app.
Step 2: Develop Your App
Develop your package by creating a scratch org using Salesforce Extensions for VS Code. Add all necessary metadata components to your project directory and ensure they are in the correct location.
Step 3: Configure and Create Your Package
Specify your package’s namespace in the sfdx-project.json file, and review the project file to ensure it includes the settings and any dependencies your package requires.
Create a scratch org definition file, or an external .json file, that specifies the features and org settings required for the metadata in your package.
Then from your local Salesforce DX project directory, create the package using the force: package: create Salesforce CLI command. Only run this command once for each package you create. This CLI command is run against your Dev Hub org, and your Dev Hub org becomes the owner of the packages you create.
Step 4: Create a Package Version
From your project directory, create a package version using the force:package:version:create Salesforce CLI command. When you create a package version, you take a snapshot of your package metadata to create an immutable, installable artifact. As you iterate on your package, you come back to this step and create new package versions.
Step 5: Install and Test the Package Version in a Scratch Org
Create a new scratch org to test out your package. You need a new scratch org for this step. Don’t reuse the scratch org that you used to develop your package in step two.
Install your package into the new clean scratch org using the force:package: install CLI command, and then open the scratch org and view your app.
Step 6: Promote and Release the Package Version
A package version is, by default, a beta version until you promote it. Beta versions can’t be installed in a production org. This safeguard ensures that the package version you release is production ready.
When a package version is ready for the world, you promote the package version to be released using the force:package:version: promote command.
To promote a package version to release, the Apex code must meet a minimum 75% code coverage requirement, and every Apex Trigger in a package needs test coverage.
Automate Package Development Steps
Write continuous integration (CI) scripts to automate these package development steps. For example, you could write a script that creates a package version, creates a scratch org, installs the package version in the scratch org, runs Apex tests, and emails the test results to the release manager.
Gaps Between First-Generation and Second-Generation Managed Packaging
The following functionality is supported in first-generation managed packaging, and not yet supported in second-generation managed packaging. We’re working to address these feature gaps.
- Package versions can’t be deprecated.
- Apex VersionProvider isn’t supported.
- A default language for labels in packages can’t be specified.
For a complete list of the metadata you can include in a 2GP, see the Metadata Coverage Report
Conclusion:
In conclusion, Second-Generation Managed Packages (2GP) offer many benefits for Salesforce developers, including enhanced modularity, more precise control over dependencies, improved testing capabilities, simpler packaging and distribution, and automation-friendly packaging operations. Namespace sharing in 2GP makes it easier to share code between packages, manage dependencies, and install/upgrade packages. Sharing code among small modular packages in the same namespace is also supported. 2GP’s flexible package versioning, enabled by package ancestry, allows developers to easily abandon unwanted versions and group related versions together. Overall, 2GP is a game-changer for Salesforce developers, offering more efficient and effective packaging processes and the ability to build better applications for customers.
Ready to Transform with AI?
More Insights for you